


So many of you have pinned this already-thank you! You totally made my day. But here is the real post you will want to pin- and make sure you click on the blog title and get the direct URL to this post so it will help everyone find the right page and not just my blog in general.
This project really is easy. I made it for my mom and MIL and I heard from both sides that it made them cry- good happy tears though of course.
Materials:
-Wooden board/ frame thing (got mine at Michael's)
-scrapbook paper- for board back, clothes pins, etc.
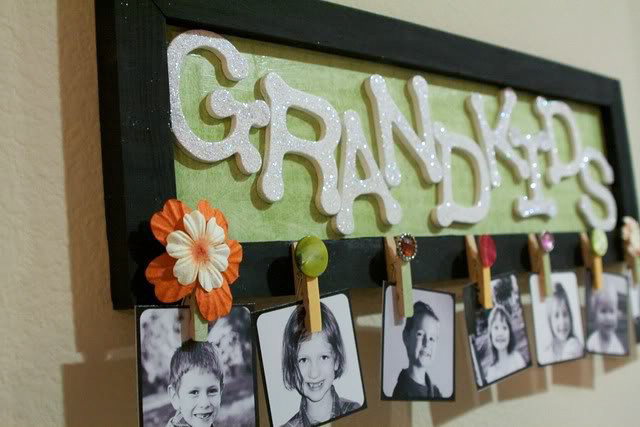
-Wood glitter letters- approximately 1 1/2" tall size (.99 each at Michael's)
-mod podge
-mini clothes pins
-decorative accessories (flowers, buttons, etc)
-paint (I used black acrylic paint)
-paint brush (I used foam brush)
-scissors
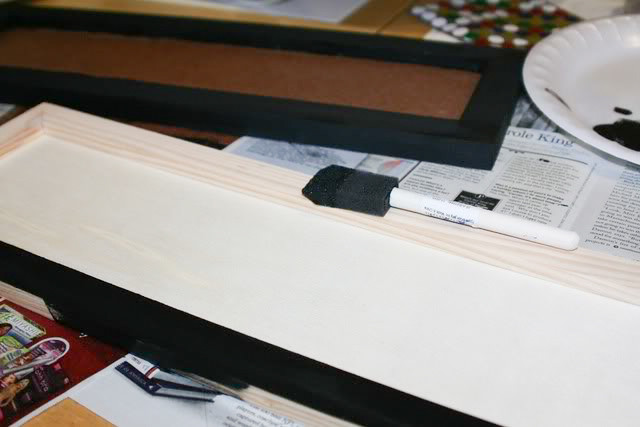
You can use any rectangular board you would like- I found these at Micheal's they are ones where the back comes off- which makes it so easy for putting on the paper.
1. Paint the board your desired color
2. Cut the scrapbook paper you want to the right size to cover the back. I used the bottom half of two identical 12X12 papers- there is a seam, but when you mod podge over it (when putting on letters) the seam pretty much disappears.
3. Apply a good layer of mod podge to the back piece of the board and glue paper on. Make sure you smooth out any air bubbles.
4. Once the glue is dry arrange the letters on the paper.
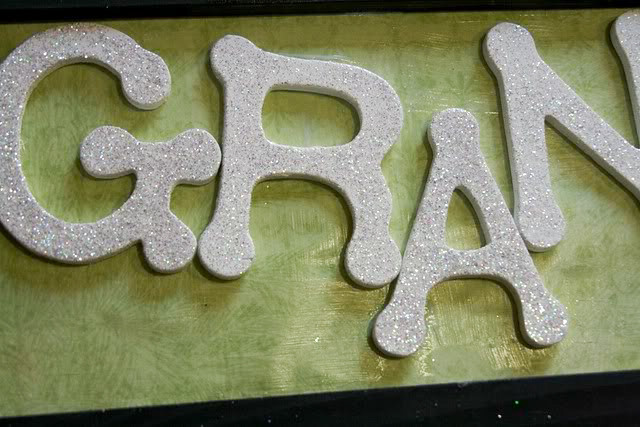
The letters this size will NOT fit straight across, so you need to zig-zag the letters. I laid out the letters then would pick up one letter at a time, apply a layer of mod podge on top of the paper and then place the letter back to glue into place.
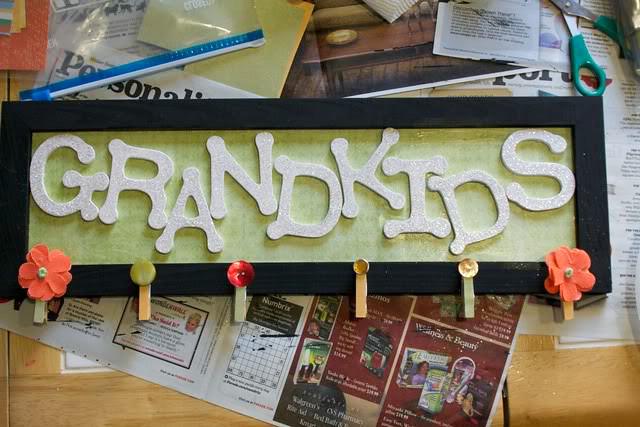
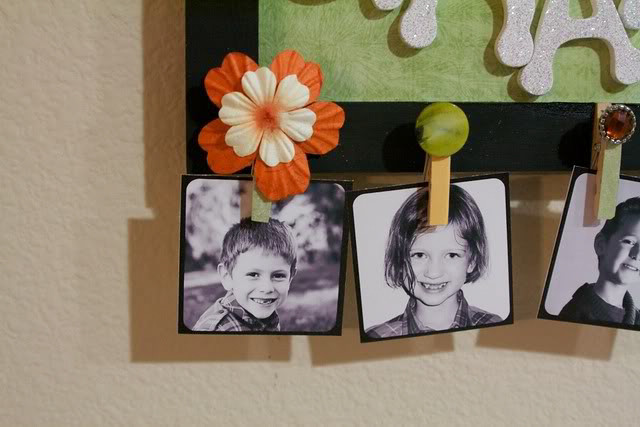
5. Figure out how many clothespins you need- you do not want to do more than 8 with a board this size as it's too crowded. So, for my mom who currently has 13 grandkids, I just did 6 pins- one for each of her children and then have family pictures hanging in each spot. If there are possible future grandkids, you can make a holder spot card- shown later.
6. Cut out scrapbook paper in color(s) desired to size of clothespin face- I laid the clothespin on the backside of the paper, traced it then cut this out.
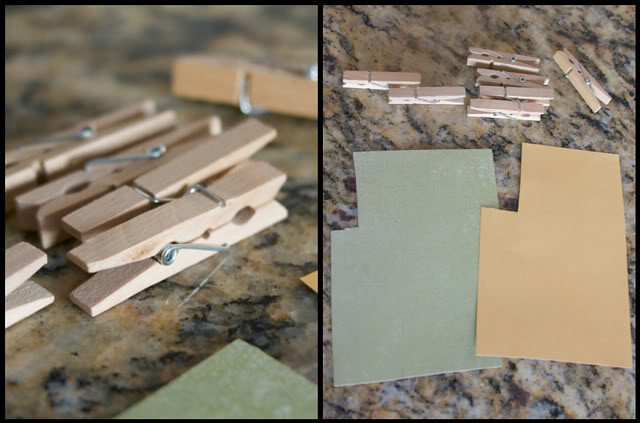
Paint a thin layer of mod podge onto the clothes pin then place the paper on the clothes pin. After the mod podge is dry, trim any extra as needed.
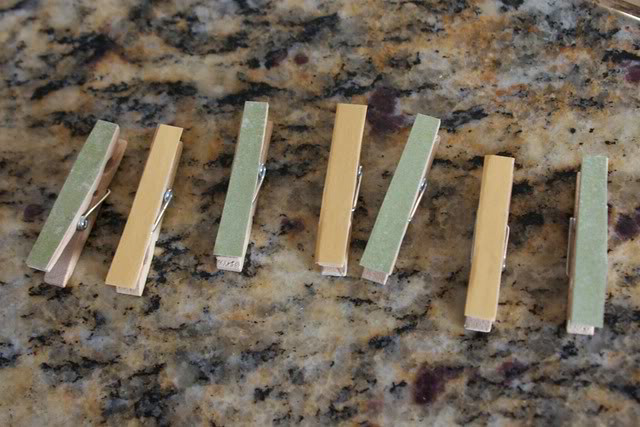
7. Glue on with mod podge any embellishments onto the top (part you push on to open clothespin) of the clothespin. (I found my embellishments in little bags on clearance row in Michael's)
8. Arrange clothes pins on board spacing evenly. I lined up the top of the clothespin with the top edge of the boarder.

Once you have them spaced where you want, apply a coat of mod podge to the back of the clothespin making sure the end that can pinch and hold the pictures is down. Hold into place for a minute or two while mod podge dries.
9. Print out pictures of grandkids- for my board I made each picture 2.5" x 2.5"
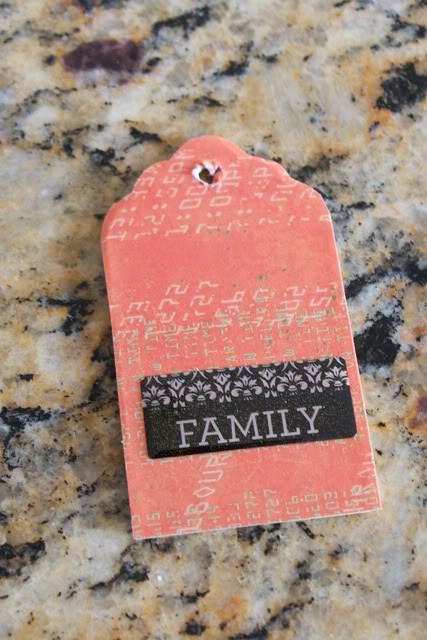
10. Optional- if you need an extra space (like I did for my little sister who got married a year ago and doesn't have kids yet) you can make a filler card so there will not be an empty clothespin. For my filler card I used a wooden tag I bought from Pick Your Plum a site that my good friend Janette of Johanson Journey told me about that is so worth signing up for!
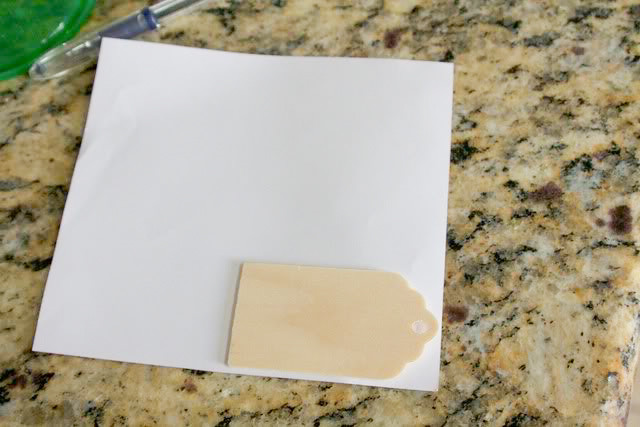
I traced it onto the wrong side of some scrapbook paper and cut it out and mod-podged it on. When it was dry I placed a "family" sticker (from clearance row of Michael's) on it. I poked a hole through the paper and tied a string to hang the card from.
So there you have it! No fancy machines or crazy painting skills required and a gift that will truly be loved. You could also make a similar sign that says "Family" and hang pictures of your own kids. Let me know if you make it, would love to see how yours turns out.
P.S--Tomorrow is my Ten Things to Smile About Meme-- where you can look back and find ten things that made you smile in December-- please come back and link up!! And the winner of the 2011 Review Extravaganza will be announced Wednesday-- you can link up through Tuesday at midnight!
I am linking this post up at the following crafting blogs


I love that, so creative!
ReplyDeleteThis is too cute! I can only imagine how much they loved it!
ReplyDeleteStill love this!!!!
ReplyDeleteThis is awesome! You did a great job. Great for grandparents!
ReplyDeleteI love this ♥
ReplyDeleteWhat a great gift.
ReplyDeleteThat's too cool!!!
ReplyDeleteWell, you know how much Mimi loved this! Maybe I can make it for Todd's mom for mother's day!
ReplyDeleteMother's Day present indeed! And maybe like a safety pin to attach Great-Grands. ;) It really turned out cute.
ReplyDeleteyes! i pinned this and hopefully will be making it soon! thnx!
ReplyDeleteSeriously awesome. Repinned so that it goes to this page!
ReplyDeleteLove it!~
ReplyDeletelove this to cute
ReplyDeleteYou are so creative, and I absolutely love this project! :)
ReplyDeleteI haven't seen this on Pinterest! Seriously...how did I miss it? SO. Freakin. CUTE!!
ReplyDeleteI hope you had a wonderful Christmas and lots of fun ringing in the New Year!!
Mwah!
So very cute!
ReplyDeleteYou are amazing creative!
Aww! That is so lovely! You really are talented, you know that, right?
ReplyDeleteThanks for sharing how you created this - I love it! I think I'm going to use it for several people and alter it slightly with different words. Can't wait to try it out!
ReplyDeleteAwesome!!! I was hoping you'd give us step-by-step instructions (for us less crafty people). It turned out beautifully!!
ReplyDeleteXO
LOVE IT! I still want you to make it for me though.
ReplyDeleteBest daughter/daughter in law EVER!! Love that, want that about as much as I want Grandkids....And I WANT grandkids!! :)
ReplyDeleteI absolutely love this. Now if I could just find the time to attempt it!
ReplyDeleteThis is so great! My mother in law has 17 grandchildren with 2 more on the way so I'd have to modify it a bit for her but still! I love the idea. I hope you don't mind but I shared this on my Facebook page. :) Thanks for the tutorial!
ReplyDeleteOMG, how did I miss this!?!?! I cannot express how AWESOME that craft is!! SERIOUSLY!! ADORABLE!!!!!!!!!!
ReplyDeleteYou should sell things like that!!
Thanks for the shout out!! You're the best!! Seriously!! So sweet and I've truly appreciated your help/opinion!! means a lot!! glad we're buds!
This is super cute! I'm glad you added it to the Stumble FB group, because I missed it the first time you posted it.
ReplyDeleteGREAT IDEA!! omg I am pinning this!!!
ReplyDeleteLove this! I'm going yo make it soon. What size was your wooden board frame? I'm m gonna have to send my husband out to get mine.... I'm on bedrest.
ReplyDeleteYou know I am not sure, it was probably about 15" long and 6" tall? It is one of the standard ones available at Michael's.
DeleteOkay thanks, I'm sure we can find it.
DeleteI have searched and searched for the wood frame... I can not find one anywhere! I am thinking of making my own frame. You arent sure of the size? I cant even find one on the internet.
DeleteThe pictures are 2X2" So I am guessing it is about 13" long by 5 or 6" tall. I will call my MIL and ask her to measure it for me.
DeleteI know this is like way old lol but I'm wanting to make this as a Christmas gift and I can't find this frame anywhere lol
DeleteI know this is like way old lol but I'm wanting to make this as a Christmas gift and I can't find this frame anywhere lol
DeleteEven if you just found a long rectangle plaque like piece of wood, something like that could even work too. If will let you know if I happen to see something similar in any stores.
DeleteI love this and have just started making my own version to give to my parents for Christmas this year, with photos of my three children. I'm improvising a bit, I bought a 20 by 8 inch picture frame and took out the mounts, and I'm making my letters myself from cardboard wrapped in yarn as I had card and yarn at home already. I will post a link to a photo once it's done, thank you for the idea!
ReplyDeleteI love this!! Im new to using mod podge..is there a certain kind for wood or can i use the same mod podge (matte) that is used for pictures?
ReplyDeleteI just use the standard generic mod podge so use the matte kind for pictures would work great.
DeleteThk u so much..i cant wait to get started
DeleteMy mom is going to be THRILLED this Christmas! Thank you for this great idea!
ReplyDeleteI love this! What was the overall cost for all the items?
ReplyDeleteIt has been a while since I made it- so this is all guess
DeleteSign $10 (use 50% off coupon)
Scrapbook paper (I had- round up to $1)
-Wood glitter letters- approximately 1 1/2" tall size (.99 each at Michael's)- so $9.00
-mod podge (already had about $5 bottle?)
-mini clothes pins- $2
-decorative accessories (flowers, buttons, etc)- discount rack $2
-paint (I used black acrylic paint)- $1
-paint brush (I used foam brush)- $1
-scissors
--So maybe about $30-- but probably less as you probably have a lot of the supplies and I rounded high for everything.
Awesome, thanks!
DeleteI did a modified version of this and it turned out great. it was so simple. thanks for the instructions!!!
ReplyDeleteThis is such a cute idea. I had to make one for my mom for Mother's Day. Here is my rendition: http://pinterest.com/pin/220887556696419244/
ReplyDeleteHey! Do you make these and sell?
ReplyDeleteEmail me at akumlien@gmail.com
About what size was the rectangle frame?
ReplyDeleteIt is about 2 1/2" x 6" maybe? I will have to measure it when I am at my MIL's house next time
DeleteIs this just a regular picture frame?
ReplyDeleteNo, it more of a blank craft frame I guess you could call it, one that would be found at Michaels in the row with all the bare wood that you can use to paint. It is just one solid piece, with an edge, the second picture with the paint brush shows what it is pretty good.
DeleteIs this just a regular picture frame?
ReplyDelete