


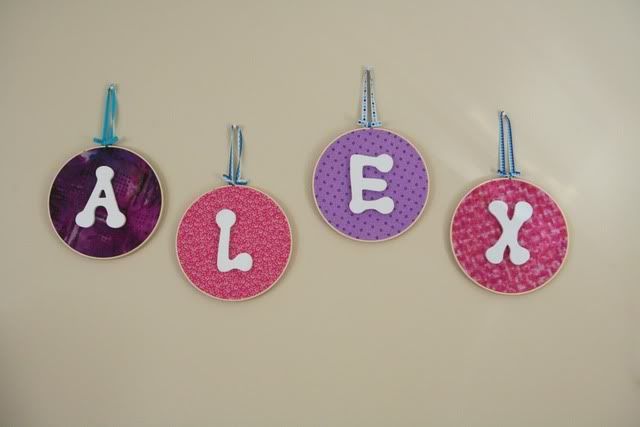
 I made this project back in November when my mom was here and we were going crafty crazy, can see all of the projects we made here, but have never told how we made it. This project is so easy! And it is also one of the few things we allow to hang on the wall over my daugther's bed (earthquakes here-don't want anything heavy falling on kids while they sleep)
Supplies:
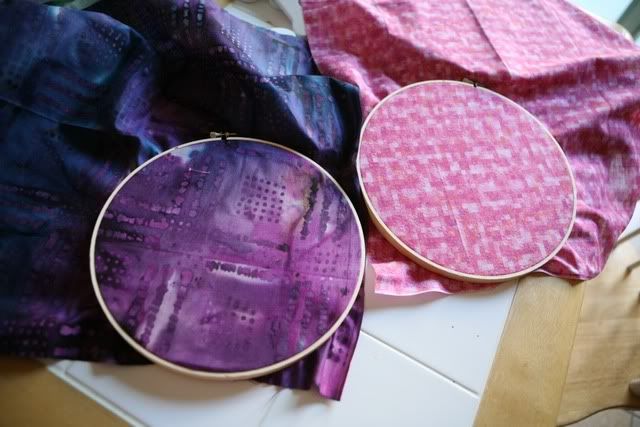
Embroidery hoops- one for each letter in name
Fabric
Wooden Letters for name
Glue Gun
Scissors
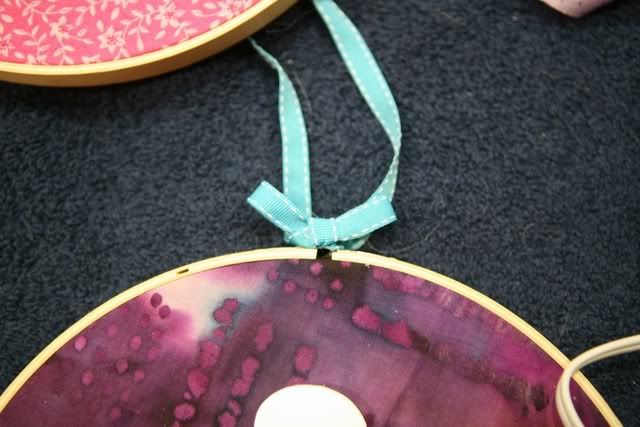
Ribbon/string to hang it with (got mine from $ bins at Target)
Did you know fabric stores sell fabric quarters? I did not as I am not a quilter-but these were perfect for the project as then I could get four different colors without having to pay for a lot of fabric. (if you have scraps you like, use those!)

First place your fabric in the hoop, making sure it is in tightly and smoothly; secure the hoop closed.
 Roughly (and I really did roughly) cut the fabric closer to circle of the hoop- but leave some extra to glue down to help secure (as you don't want to cut it exact to only have the fabric slip out)
 On the wrong (or back side) hot glue around on the hoop and push the extra fabric down gluing into place (this is the side that will be against the wall so doesn't have to be pretty)
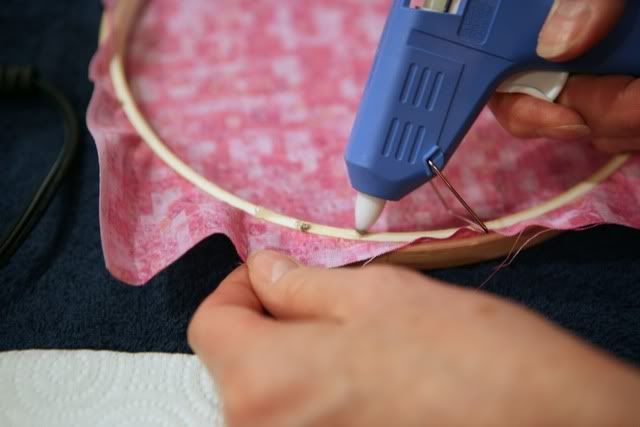 When dry, flip over and hot glue each letter onto each fabric- make sure the hook is at the top center. I found it easiest after I glued the letter in place, I carefully flipped the entire thing upside down, so the letter was on the counter and then pushed and held the fabric onto the letter while it dried (though careful it is hot!)
Tie the ribbon into a bow and wrap and tie around the embroidery hook and then hot glue onto the hook for extra security. Hot glue the ends of the ribbon to create a closed loop.
Then hang and enjoy! (I just used push pins to hang them from)
Since it's Tuesday linking up with two of my lovely ladies Impulsive Addict and Seriously Shawn for
And since it's another project I am or will be linking up (some are Friday link-ups) here


I am loving these! How creative!
ReplyDeleteI can totally do this!!! I love it. Think I will make these for Allison.
ReplyDeleteThose are super cute! My daughter wants to redo her room a bit and this might be something to add to her walls.
ReplyDeleteVery cute!! Perfect for a girl's room!
ReplyDeleteVery cute and smart...thinking of the heavy things above my daughters bed, hum. Might need to try this project!
ReplyDeleteSo super cute!! You are so talented momma!!
ReplyDelete~Becca
That is adorable!! I can't actually "embroider" so I think that is way awesome.
ReplyDeleteThose are super cute! Thanks for sharing!
ReplyDeleteI love it! I'm totally stealing this idea for the baby's room. :)
ReplyDeleteSo cute!~
ReplyDeleteGreat idea! I love the way it turned out.
ReplyDeleteVery cute! You did a great job!
ReplyDeleteEmmy, this is SUPER CUTE! Hmm, you've got me thinking!!! Thanks so much for being inspiring! I'm glad to know about your blog! Thanks for your sweet note!! Excited to be your newest follower Emmy!!!
ReplyDeleteXO, Aimee
Cute! How much was your total cost?
ReplyDeleteSo much easier than I thought it was going to be!
ReplyDeleteThat is super cute and you made it look so easy!!! I love it! Is Alex's name short for anything? Just curious.
ReplyDeleteThanks for linking up with us, friend! oxox
I really like this! Very nice looking and cute too!
ReplyDeleteI'll have to remember this one. :)
Oh how cute! I'm definitely going to have to make some of these! :)
ReplyDeleteSkylanders Craze Part 2, Wishing for Snow and Advanced Potty Training: RTT Rebel
So creative! I love these - turned out beautifully.
ReplyDeleteSo stinking cute!
ReplyDeleteUgh, I have the time, but not the patience or the creativity for that. Love the idea though:)
ReplyDeleteJill
Those are so cute! your totally crafty!! I'm jealous!
ReplyDeleteYep, you got it girl, you totally have the crafters talent! Those are so stinking CUTE!!!
ReplyDeleteFINALLY got around to thanking you lovely ladies for your gifts--thought I'd wait until I could photo all my loot together. Thanks again, and those ornaments are beautiful. You're quite amazing!
ReplyDeleteThose look so cute!
ReplyDeleteYou kill me with all of these easy tutorials - things I don't even think about!! I'm so glad you're posting them all!
ReplyDeleteWow, it's so simple and easy to do! And I have 2 left hands LOL. This, I can totally do. Thanks for sharing.
ReplyDeleteSuper cute and I love that it's easy!
ReplyDeleteI bet Alex is thrilled! So cute.
ReplyDeleteAwesome, Emmy!! I love it...it looks so easy, even I could do it ;)
ReplyDeleteHow super cute is this?! Thanks for sharing!
ReplyDelete