


Once a month I get together with a group of friends and we all bring projects we are working on and visit and craft together. There is often more talking than creating but it is so much fun. This month, several of us were inspired by the project found here on Pinterest and wanted to make our own.
Supplies:
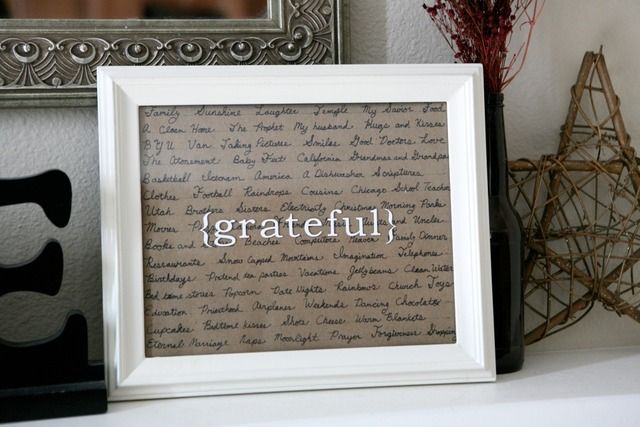
Picture Frame with Glass- any size I used 8X10
Spray Paint- I used Rustoleum Heirloom White
Contractors Paper (or any paper you want)
Pencil
Ruler
Fine Point Sharpie
Vinyl or Sticker Letters
1- Spray Paint Frame
I started with a simple, black 8X10 picture frame. I spray painted the frame Rustoleum Heirloom white (available for half the price at Home Depot). This is a beautiful color that isn't a true white, but more antique looking.
2- Cut Paper Backing
I then cut a piece of brown contractors paper to fit in the frame. I used the back of the photo frame for a template for the correct size.
3- Line Paper
I then measured and lightly drew straight lines across the paper with pencil every 1/2" as I knew I would never be able to write text straight without it and it really does not take away from the piece at all.
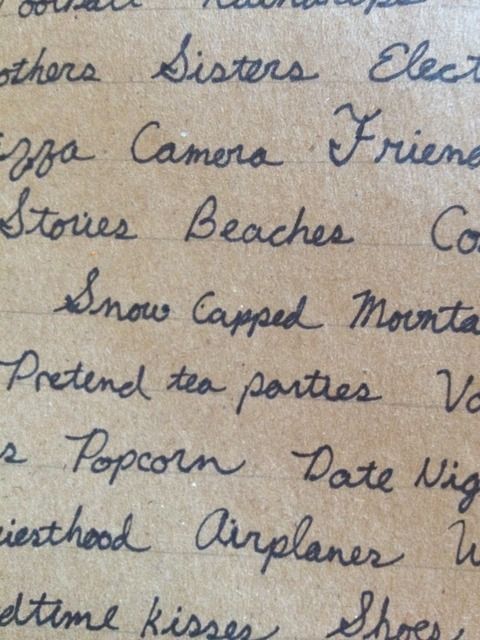 |
| Shows lines and words up close |
4- Write Grateful List
I began writing with sharpie what things I was grateful for as I thought of them, so in totally random order. Leave a little room on all four sides or when you put it in the frame they might get cut off. I had to pull up a web site with how to write letters in cursive as it is amazing how many capital letters I don't remember anymore.
Don't worry if you don't have the best writing, I certainly don't- there is enough text and it is small enough that even imperfect writing still looks great.
You can use a bigger frame if wanted but the bigger the frame the more you will have to write.
 |
| my completed list on the paper |
5- Cut Grateful Letters
Then I used my Silhouette to cut out the word grateful. I used Bookman Old Style font and my font was 6" long and just a little over 1" tall.
6- Place Sticker and Enjoy!
I measured to find the mid point of the frame and tried to line up the words as evenly as possible.
Let me know if you try it, I would love to see your finished product!
You can find my other projects by clicking here or on my DIY/Projects tab on top.
Will be linking up with the following crafting parties this week.


I can't even tell you how much I love that! AWESOME idea!
ReplyDeleteThat looks great and so easy!
ReplyDeleteI love this! It is gorgeous!!
ReplyDeleteI really love this idea!! It's even simple enough for me to make. :o)
ReplyDeleteThat's great that you've got a group of girls with the same interest as you. Doing something with someone else always makes it so much more fun. That's how I feel about the girls I run with!
That is super cute! Ive been looking at crafts all weekend, this is one I want to try.
ReplyDeleteThat's really cool! I love it...you are Miss Crafty!
ReplyDeleteI like that idea! I just might be able to do this one. :P
ReplyDeleteI love it, super cool, but I'm lazy, will you make mine ;)
ReplyDeleteThat's really cute. You could do a lot of things with that. Like a "family" one, with the names of family underneath. Fun.
ReplyDeleteI love it!! I'm sure that if I did the same project it wouldn't turn out as straight and perfect as yours is!
ReplyDeleteThat is really cute! I really like it Em!
ReplyDeleteI love this idea! And it doesn't seem like it's too hard even for craft-phobic me! I'm going to pin this and try it at some point. Thanks for sharing your creativity. :)
ReplyDeleteI love it it is very cool and a great way to remind yourself of all you're grateful for
ReplyDeleteThis is so adorable! I even have an extra white frame....but not a Silhouette.
ReplyDeleteThe simplest things are always the BEST!! This has given me a great idea for our Photo Wall at home, Thank you xx
ReplyDeleteI love the idea of a craft group. And your grateful sign is fantastic!
ReplyDeleteI LOVE the idea of a craft group. Do you rotate houses? I love your project.
ReplyDeleteThis is absolutely adorable! What a great idea!
ReplyDeleteI absolutely love this! Such a wonderful idea :D
ReplyDeleteWhat a beautiful idea! I am sort of in love with it. At some point in time, hopefully soon, I am going to have to try this. Emmy, you are so creative! Thank you so much for sharing!
ReplyDeleteI'm so glad that I found you on Overflowing With Creativity! I LOVE this idea! Thanks so much for sharing:)
ReplyDeleteKatie
www.funhomethings.com
This is so cute I am totally loving it! Thanks so much for sharing at my party! I'm featuring you tomorrow! XO, Aimee
ReplyDeleteitsoverflowing.com | simply inspired home living
I love this, its absolutely perfect. Thank you so much for sharing ;-)
ReplyDeleteThis is such a cute idea! I think I'm going to get some ladies together from church and do a few of these as a project. :D
ReplyDeleteI ended up making these with the sisters I visit teach! Thanks for the idea! Didn't paint the frame white, but I'm thinking about it. I included a couple pictures of mine in my post about the holidays: http://xavierandaliceanne.blogspot.com/2013/01/the-holidays-2012.html
DeleteThanks so much for sharing this idea. I've featured it in my Top 10 List of Handmade Gifts.
ReplyDeletethanks again!
Love this! Pinning it to my projects board!
ReplyDelete