


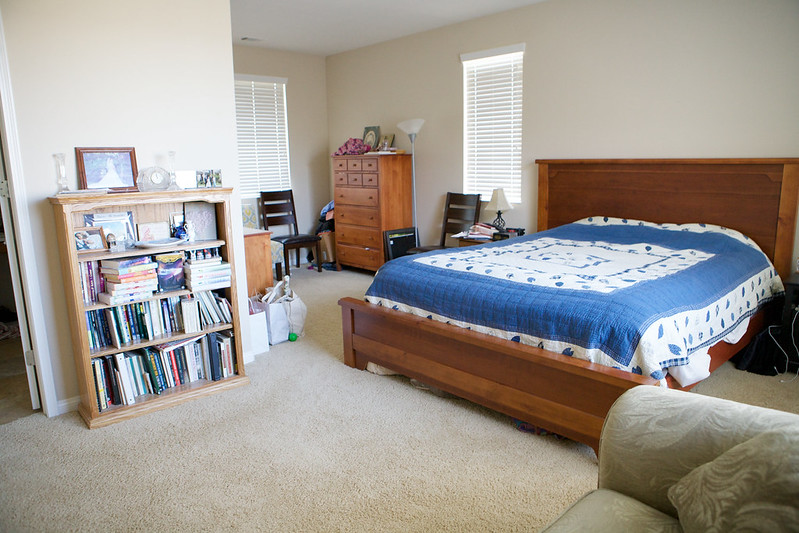
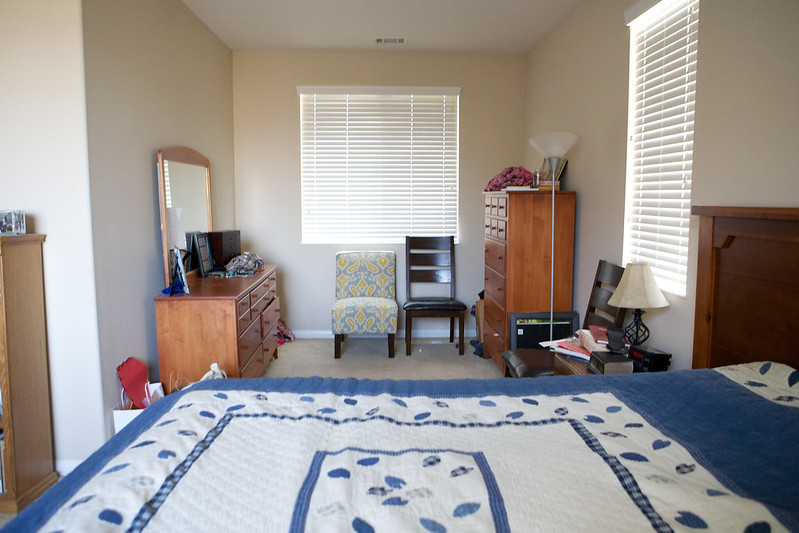
It really was sort of the dumping ground for extra clothes, extra books, extra dining room chairs, mismatched furniture....


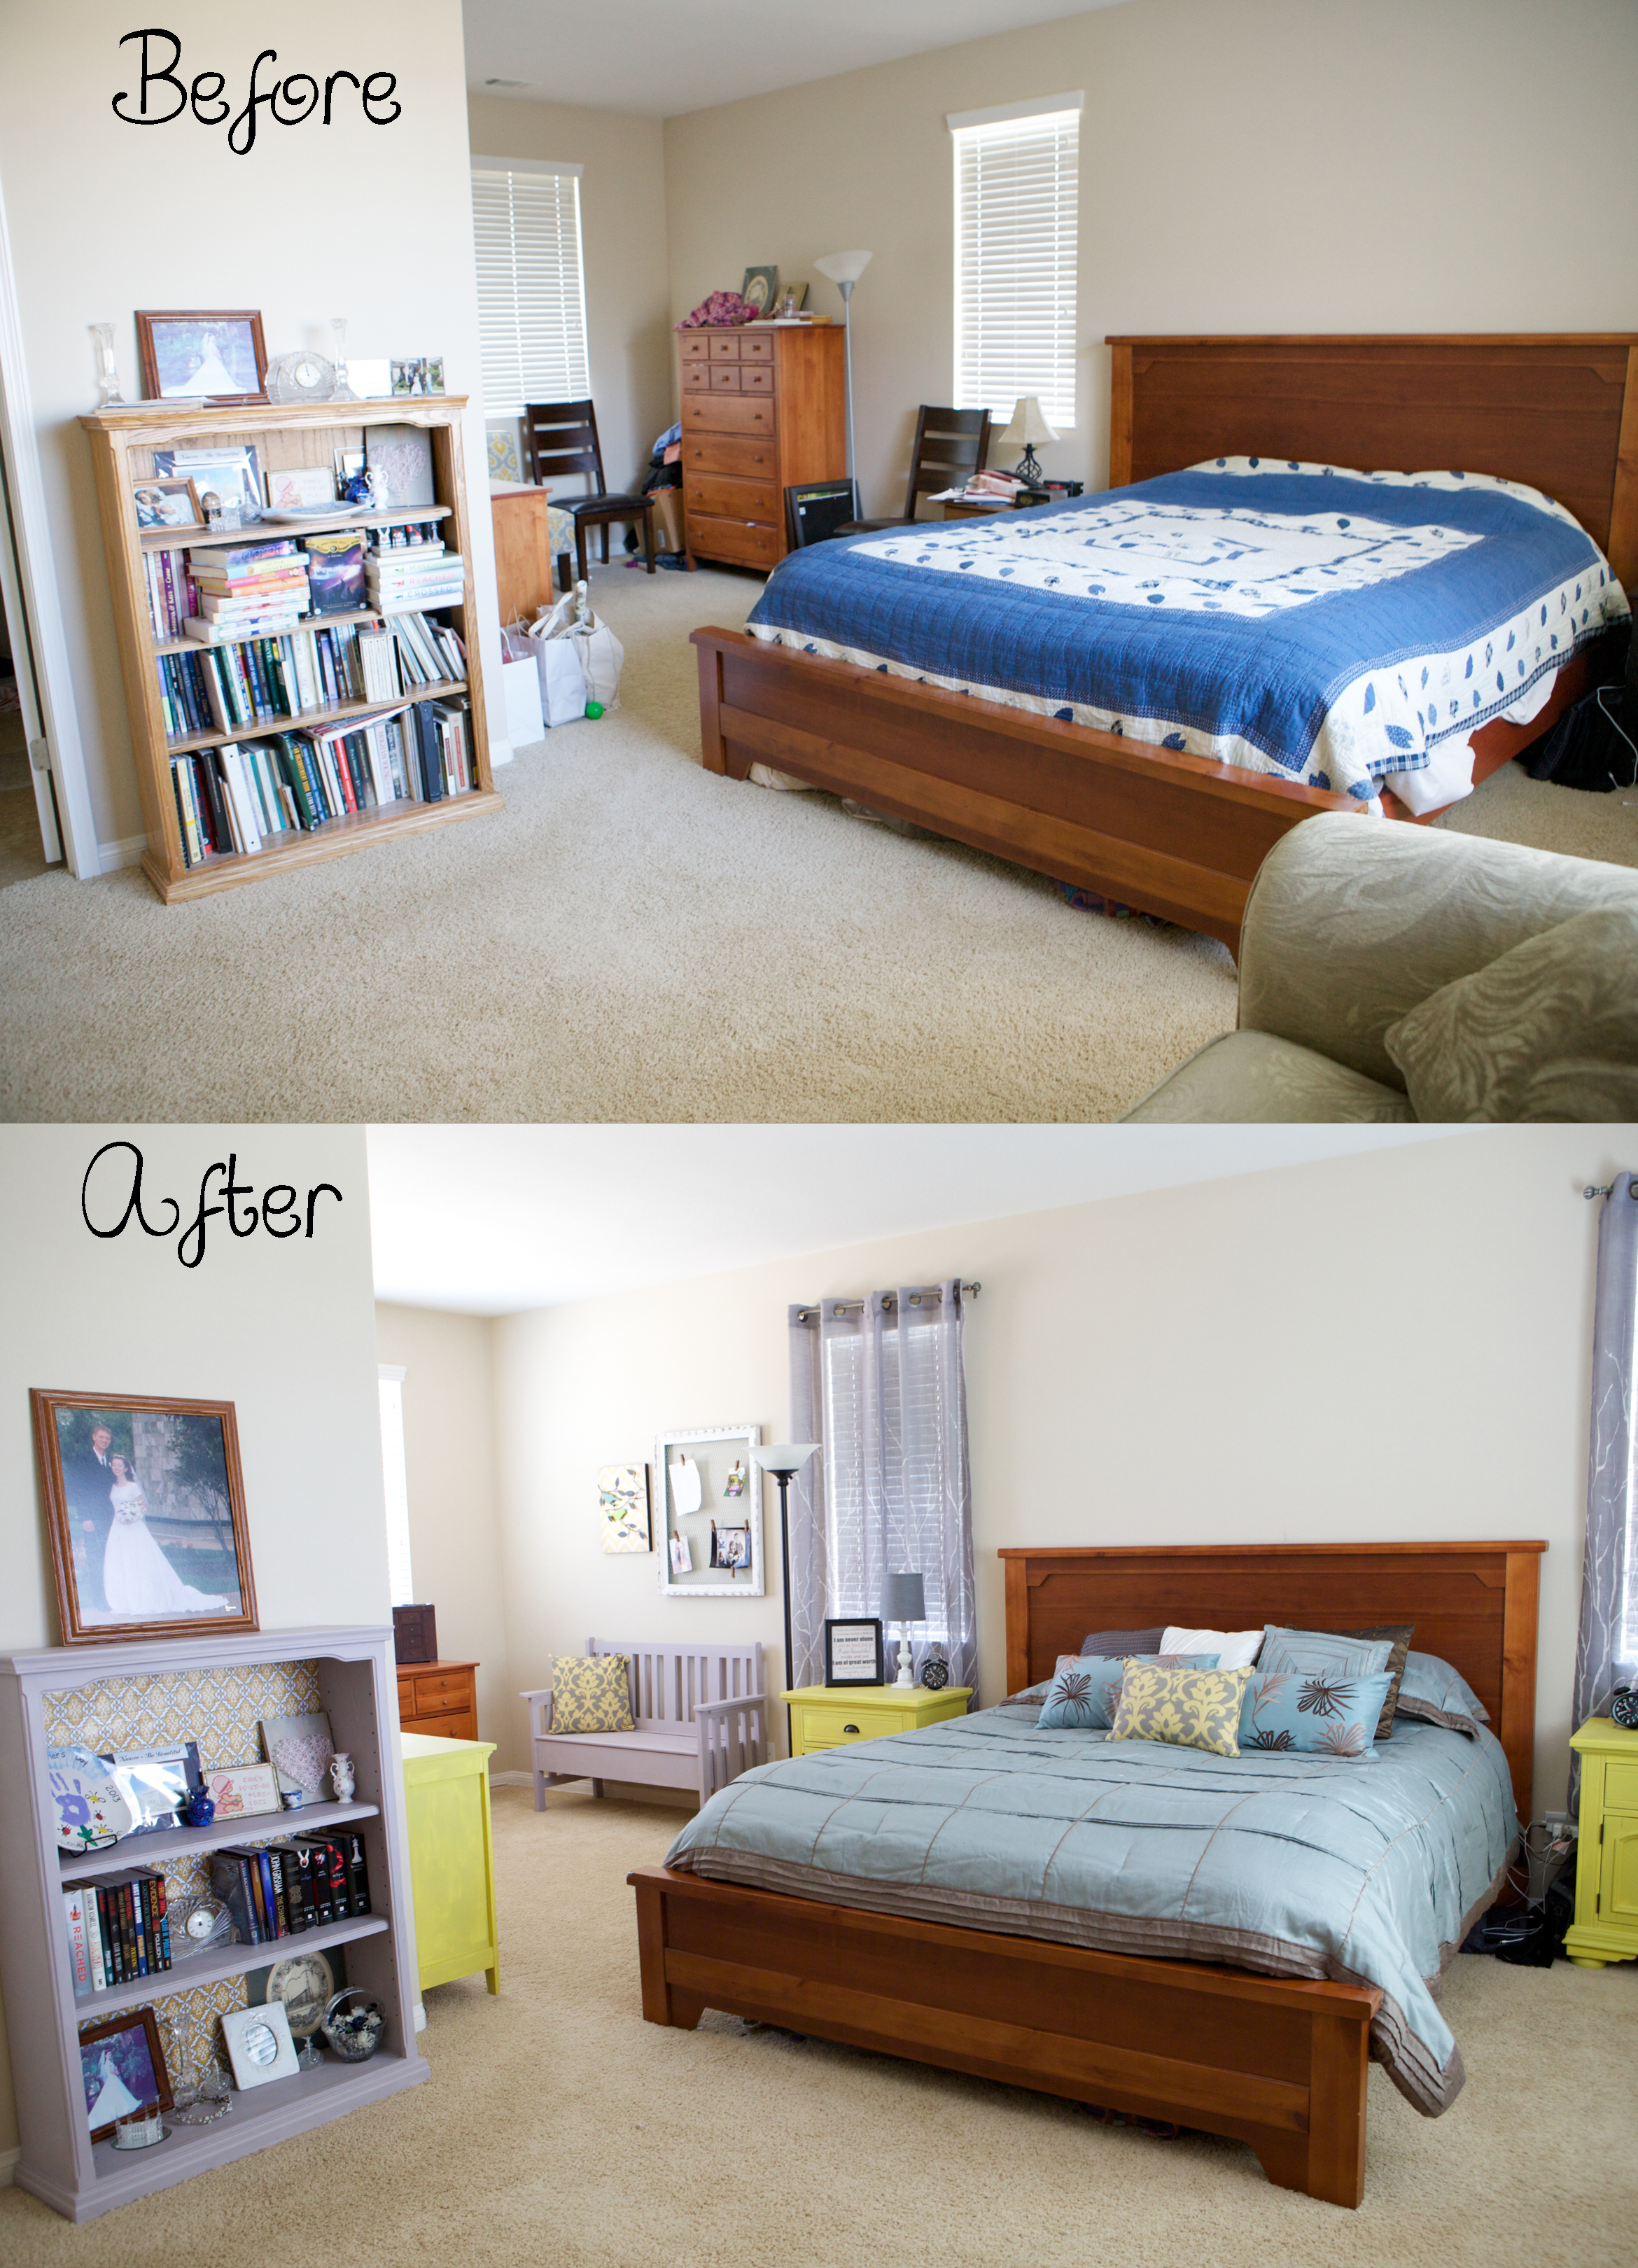
Before and Afters


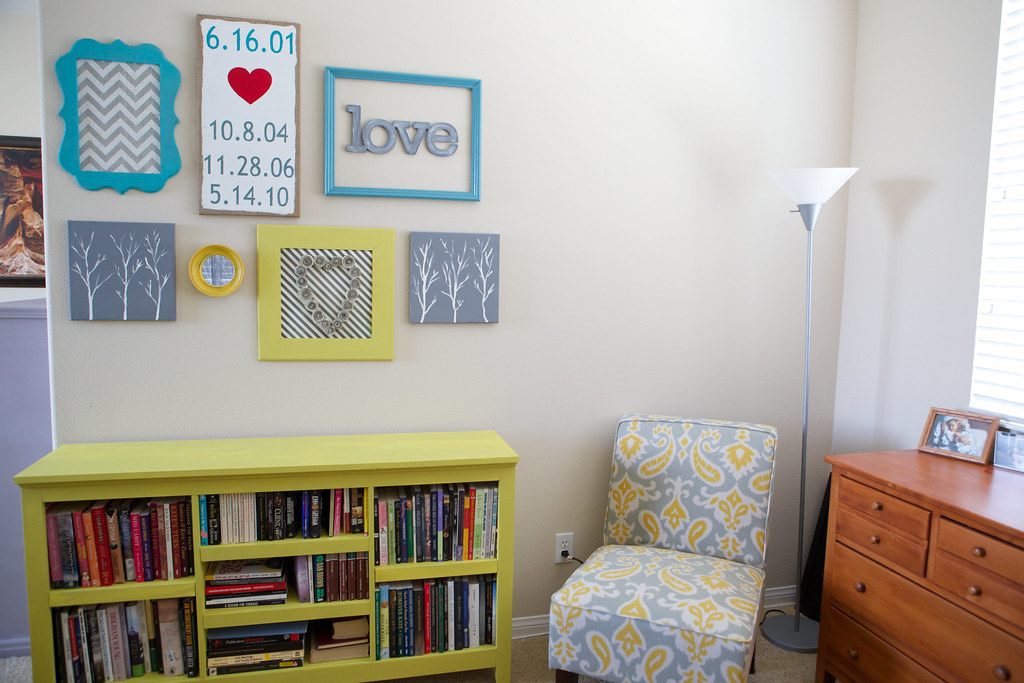
Reading Nook
Our room is an odd L-shape and the little L part is not really big enough for our bed, so it has always been this little odd place off the side. I dreamed of making it my little reading nook.

Nightstands
I have actually been working slowly on my bedroom since December. The first things I replaced was the nightstands, one was a nightstand Eric had as a kid; the other was a piece that used to be in our living room. They were much too different to re-do, so I wanted to start from scratch.
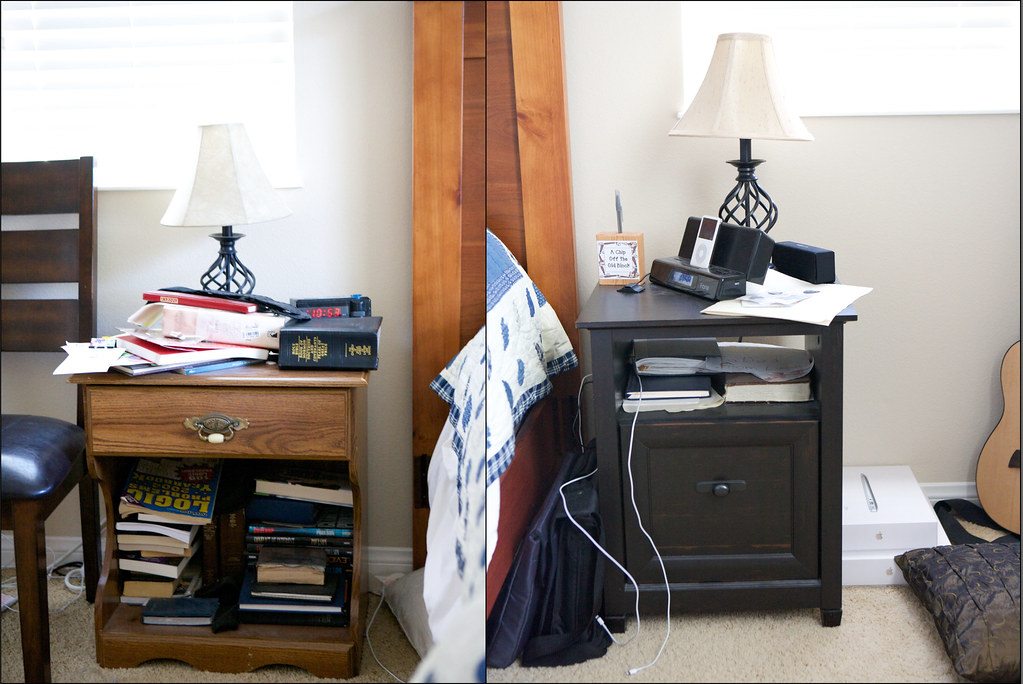

We got new lamps and new clocks too. Neither of us use the clock for our alarms, we both use our phones. Be warned the bell is pretty dang loud, but it is a NON-ticking clock, a feature many clocks like this do not have and I definitely did not want a ticky clock by my bed.


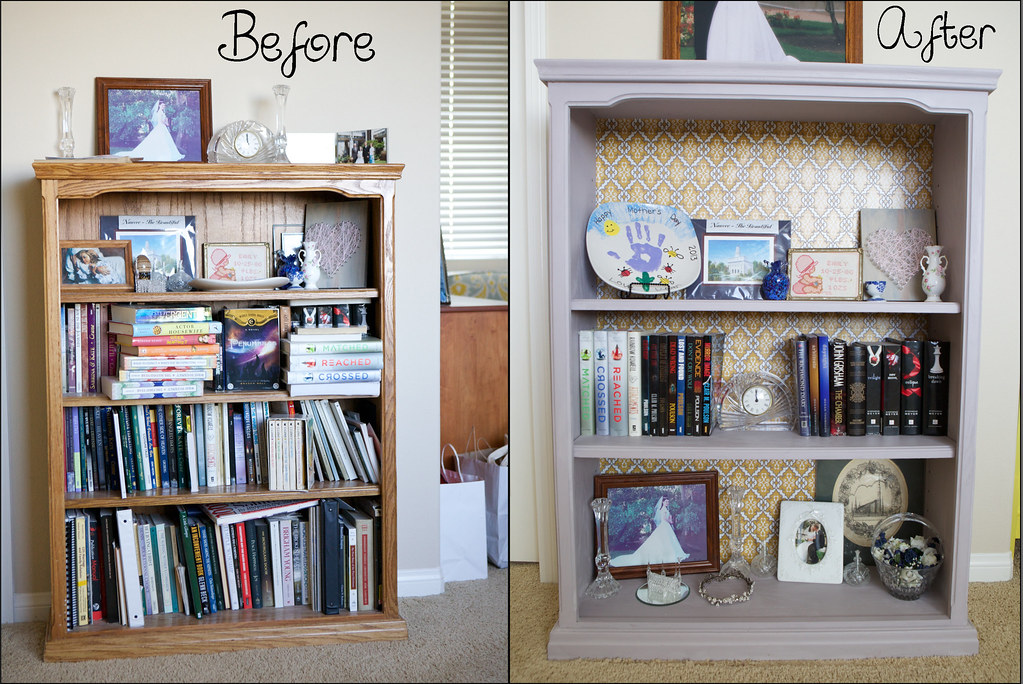
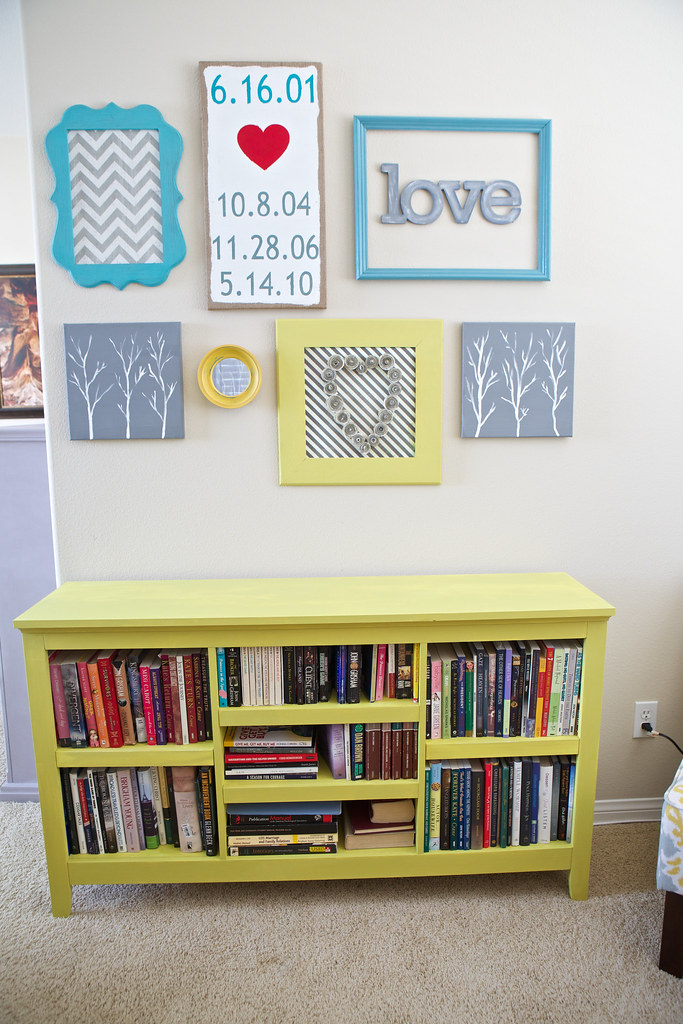
I wanted to use this book case as a place to display mementos and special things. I painted with Annie Sloan Paloma Chalk Paint. The background is actually a very thick wrapping paper that I found at Tai Pan, that I attached with spray adhesive; don't worry full tutorial coming soon.
Since these shelves no longer housed most of my books, (and they didn't all fit anyway)I needed a new book case in my reading nook.

I loved this horizontal book case from Target. I ordered it in white and painted with the same quart of Annie Sloan English Yellow (yes I finished three pieces with just one can).
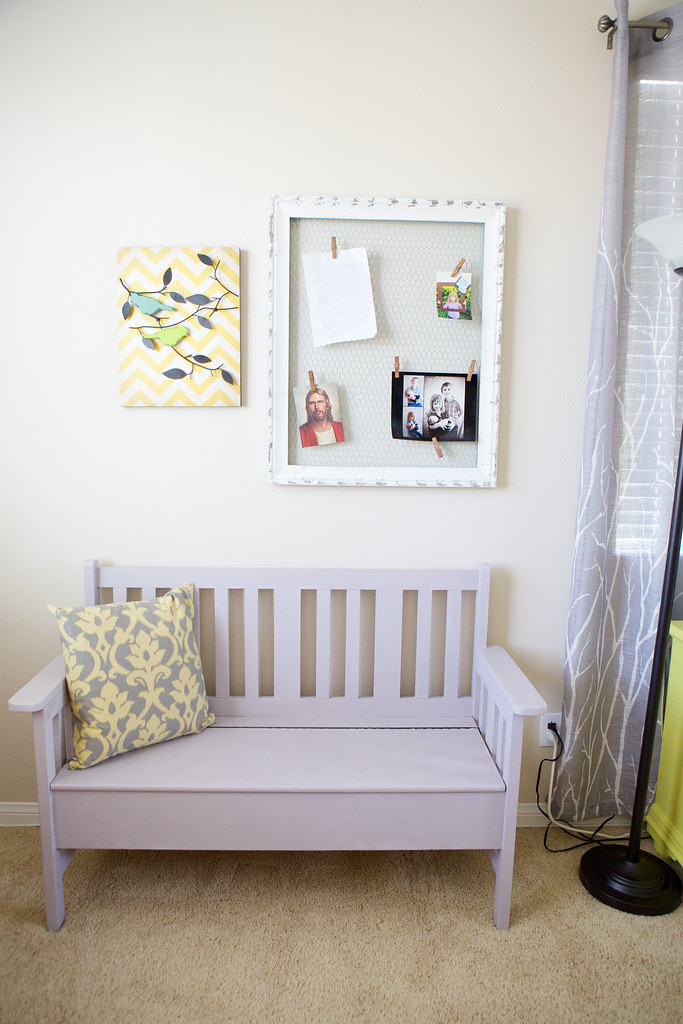
Bench
We had a love seat couch in our bedroom which we were going to move into the reading nook, the trouble is it is huge and took up half the space. So instead we moved that couch downstairs and brought up the bench we had downstairs, which I painted in the same color as the first bookcase.
That is my newly made over bedroom. We are renting our home so I did not want to repaint the walls or do anything that I couldn't take with me if we move someday. Oh, and I have to report, since finishing it, all laundry has been immediately put away. So, if you have a laundry problem like I do, just tell your spouse you need to re-do your bedroom.
During this process I learned some great tips:
5 Tips for Redoing a Bedroom on a Budget


1. Have a Plan- I looked on pinterest, thought about my room and have had a basic plan of what I wanted for several months now. I even took room measurements and had these in my phone. I also had a list on my To-Do App of things I wanted/needed to buy for my room. That way I could plan and knew what I needed when I was out shopping.
2. Reuse and Fix it Up- I really wanted a fun color for my night stands. I searched and found some fun and colorful pieces but they were expensive! Instead I got nice standard nightstands and made them the color I wanted them. I also reused most of the bedroom furniture I already had and painted a few things. There are so many great tutorials (and I will be adding some) that tell you how do redo furniture and it can save you a ton of money. Also, I did reuse our old night stands, they ended up in the boys' rooms.
3. Be Patient- I have been working on redoing my room since before Christmas. I did not go out and buy everything in one weekend as that would not have been financially possible or smart. I waited for the 30-50% off sale at Hobby Lobby, I went to Home Goods I don't know how many times until I finally found curtains I liked. You can save a lot of money if you buy things on sale or find things at a store like Home Goods, Ross, TJ Max, etc., you just have to be willing to look and leave if they don't have what you want.
4. Be Willing to Compromise- if you have a budget you are probably not going to be able to get exactly everything you want. I had some different curtains in mind but wasn't willing to spend $60 a panel to get them. So I kept looking, when I found my curtains, at Home Goods, I really liked them but they weren't what I originally was imagining, but at $24 for two panels I couldn't pass them up and now love them completely.
5. Set a deadline- While yes, I did just say you need to be patient, you also need to have some sort of deadline. If you don't give yourself a time frame it is either never going to happen or happen so slowly that by the time you are done you don't even like what you started with. In my To-Do App, I set a date for when I wanted to buy certain things. I didn't stick to it completely, but it definitely stays on your mind when it shows something is overdue.
Have you ever redone a room? What tips do you have?
***********************
Following is where I purchased the different items, with links when available. Also, as I do the tutorials, the links to the projects will be found down here too. I did not receive any of these items or am promoting any certain store, these are just the stores I like that I bought things from.Bedding and pillows- Home Goods
Curtains- Home Goods
Curtain Rods- Local linen store
Reading Nook:
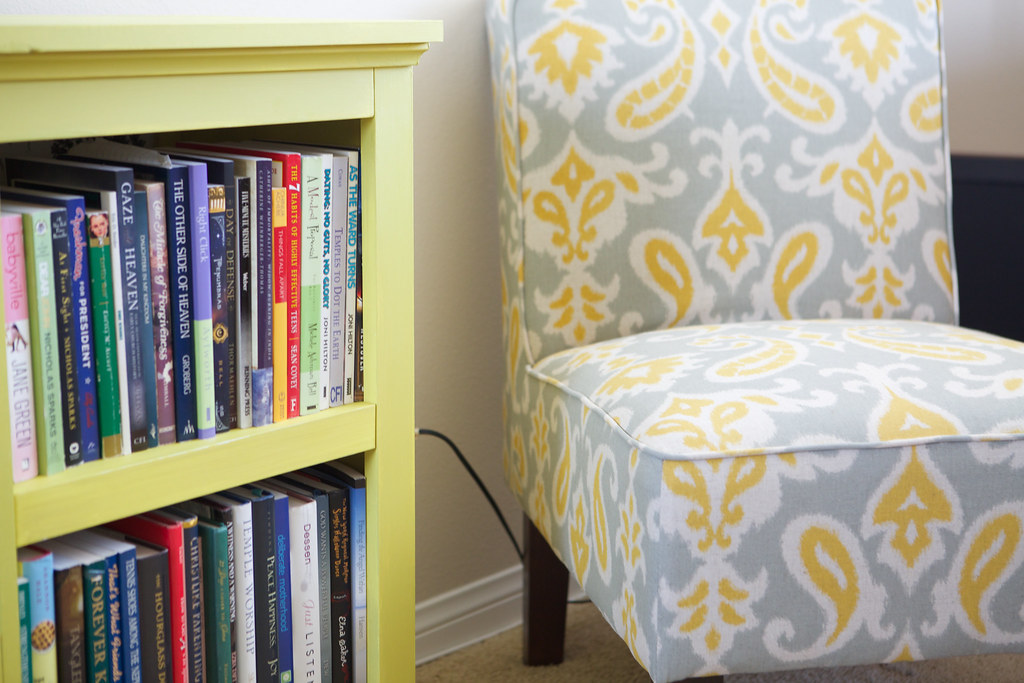
Horizontal Book Case- Purchased from Target-- Painted with Annie Sloan English Yellow (Tutorial)
Blue and Yellow Chair- Target
Lamp- we had
Dresser- we had, removed the mirror and moved the dresser under the window
Bench- we had, painted with Annie Sloan Paloma Chalk Paint
Pillow- Home Goods
Bird Art- Bought at Hobby Lobby
Wire Frame Board- bought off local garage sale site
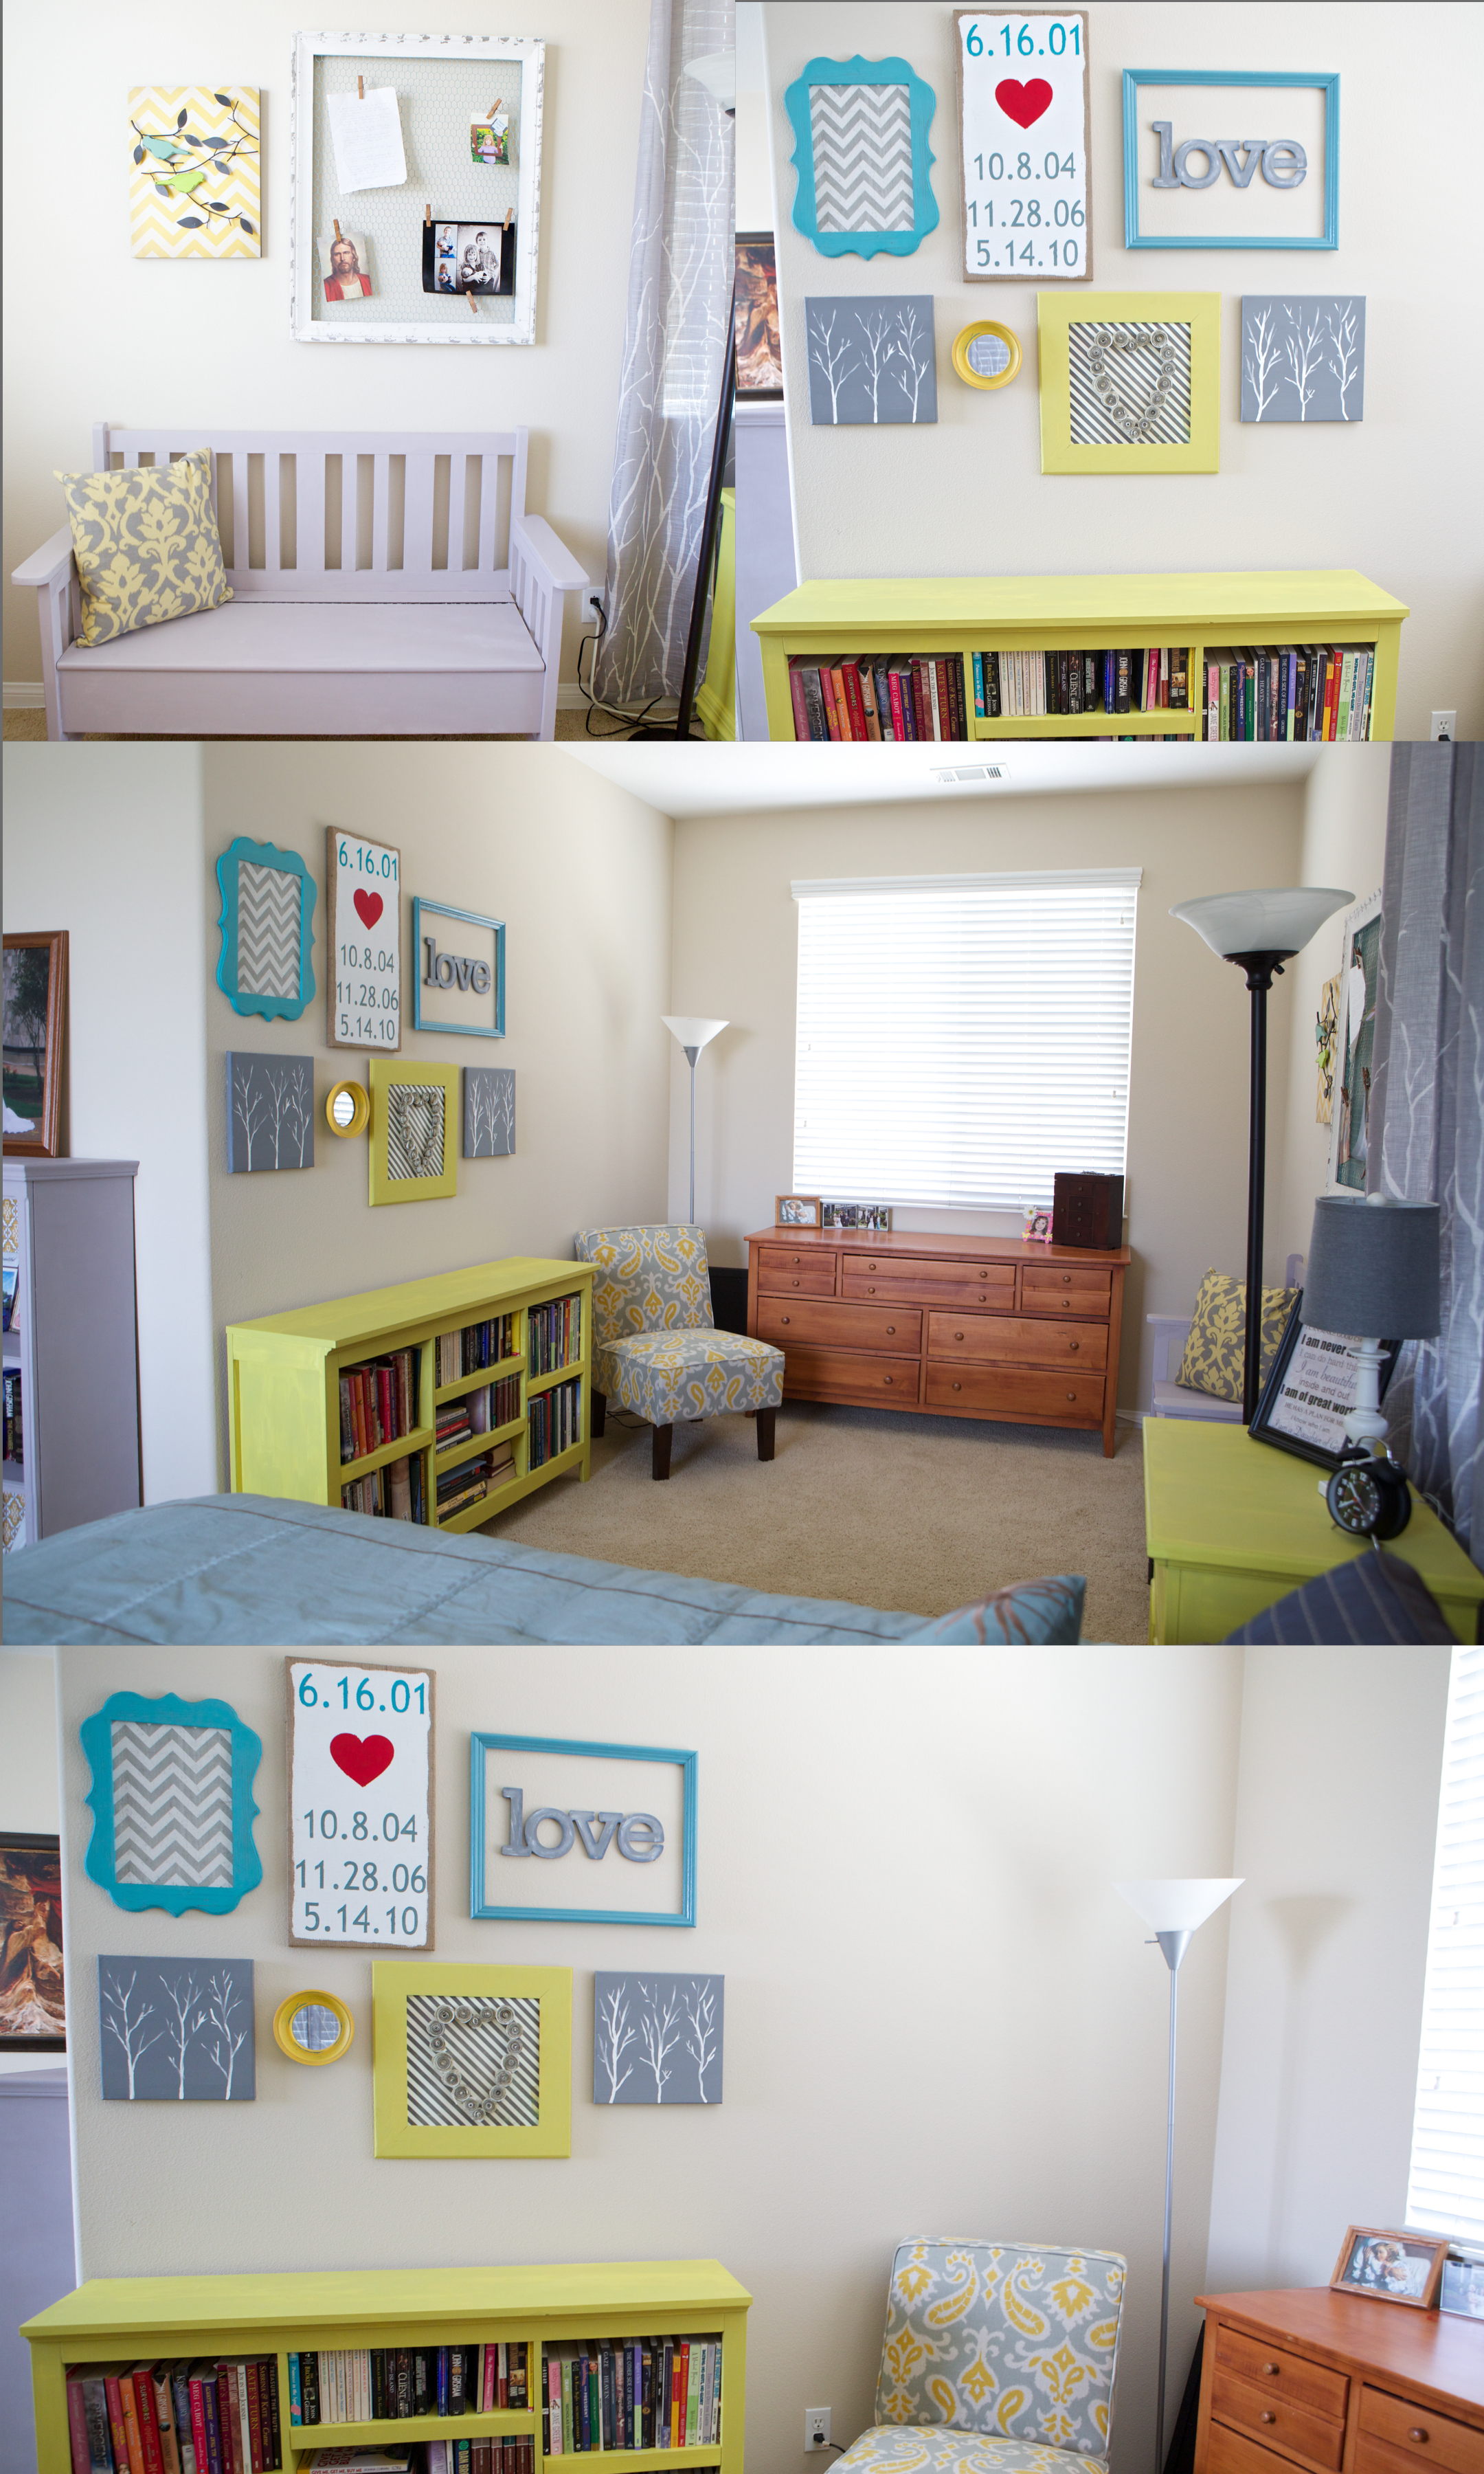
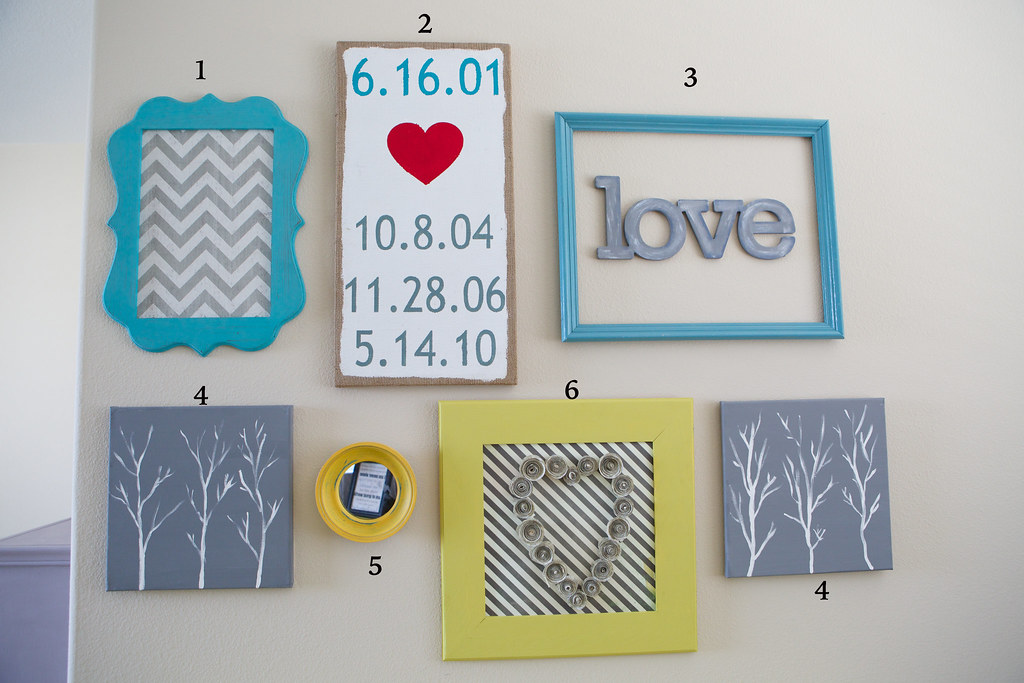
Wall Decor:
1) Purchased at Hobby Lobby
2) Date Art Work (tutorial)- purchased burlap Canvas at Hobby Lobby then created myself
3) Love Frame- Frame from thrift store, "love" word bought at Hobby Lobby than painted
4) 12x12 blank canvases I painted
5) Circle Mirror- Hobby Lobby
6) Rose Art- I created- Tutorial here
Night Stands and Accessories
Night-stands- purchased on Overstock- painted with Annie Sloan English Yellow (Tutorial)
Clock-bought on Amazon
Lamps- Target
Book Case--Already had, painted with Annie Sloan Paloma- Tutorial here
******************
Linking up with the following crafting parties


This is top notch, Emmy! I love the transformation!! The colors, the pieces you chose...everything. Bravo! You've got your own oasis now!
ReplyDeleteThank you! I really am so happy with how it all came together.
DeleteI love your bedroom! Especially since my bedspread is yellow and grey as well. Loving everything you did. Can't wait until I have the time and budget to redo my room as you have greatly inspired me. Beautiful!
ReplyDeleteThank you! I really am loving the colors. Just have to start planning and do one thing at a time, that was the way I could afford it :)
DeleteGreat job!!! Thanks for sharing your tips and I look forward to seeing your future DIY helps-- especially with the chalk paint!!! You definitely have a room to be proud of. Maybe you could host a little book reading party in your new reading area!!!
ReplyDeleteYea, that might be a little weird to have everyone go up in my room for it :) I am definitely not a chalk paint expert but do have tips as I have definitely done a few pieces now :)
DeleteVery Pretty Em! Love it! We are going to do ours too, after the bathroom is done…which is getting really close! Good thing, because this is really making me want to do our bedroom too! It's an amazing transformation and I Love it!
ReplyDeleteOh I am so excited to see your finished bathroom! It is going to be amazing.
DeleteGreat job, Emmy! I love the lavender and yellow!
ReplyDeleteThank you! It is actually a gray color, but yes it does have a more purple base than a yellow base as a gray
DeleteI love it! Especially the reading nook! The bookcase is gorgeous and I'm looking forward to the tutorial. I've got some ideas where I could use that. Now I want to start working on my bedroom!
ReplyDeleteThank you so much! I will be trying to get them all up sooner rather than later.
DeleteLoving all of the little pops of color! And any tips for doing one of those date signs for a small family? Thinking maybe our birthdates, then anniversary, then E's birthday?
ReplyDeleteThat would be a fun way to do it. I have also seen those with a “meeting date”, engagement date and then wedding date, so it is just the couple. But yes, your birth dates, anniversary and her birthday would be great! I will be doing the tutorial for how I made it soon. Probably my first or second of my tutorials I post
DeleteI love the pops of yellow!
ReplyDeleteThank you me too! That was really the inspiration and base for the whole makeover
DeleteOh my! I love every single thing! Adore that reading nook, wish I had a space like that in my house. Can't wait for the tutorials :)
ReplyDeleteThank you! Yes, I really kind of hated that space before but now I love it.
DeleteI can't believe the difference. When I started reading this, I was hoping you didn't paint your bed. I love it.
ReplyDeleteYes, my bed is actually only a few years old, before that we just had bedrames and no headboard of any sort, and it is more of a timeless color so I wanted to leave that and my dressers, but definitely wanted more color and pop yet wanted it all to work together
DeleteSo inspiring!!! Great work Emily! Oh, my daughters would love to live in your house. :) xoxoxo
ReplyDeleteAwe thank you so much! I always think the same things about my kids in your house when I see all of the amazing and fun things you are doing.
DeleteI love the yellow! Your room turned out absolutely gorgeous! I am a huge fan of painting what you have - and shopping your house for other pieces of furniture to move into different places. Thanks so much for sharing at this week's Whip it Up Wednesday.
ReplyDeleteThank you!! Yes, I too like using what I have as it saves a ton of money and sometimes just moving something to a new room suddenly makes it wonderful. We even ended up moving our old lamps to a different room in the house and they are perfect there. It all worked out great in the end
DeleteSeriously this is fabulous! It looks awesome...I really am in love with it!
ReplyDeleteThank you so much! I really am too, it makes me smile every time I go in there
DeleteFirst of all, this is a fantastic post. I love how you've detailed all your steps, listed your sources for decor and given tips and tricks. Second of all, your room is GORGEOUS. The reading nook and yellow nightstands are to die for. Just bringing that yellow in added such punch. Thank you for sharing this. My bedroom is much like your before and I've felt stuck because of my budget. This post has inspired me! I've pinned as a reference.
ReplyDeleteOh yea that makes me so happy to hear! I hope you do get a chance to redo your bedroom. Thank you so much! Your comment made my day.
Deletewhat a great transformation! Love the color combos, the room is bright and cheery! Thanks for sharing your tips!
ReplyDeleteThank you so much! Yes I too am loving the colors.. it is funny as not many years ago I never would have thought of myself as a yellow person, but I love the yellow
DeleteI love the transformation and the bright pops of color! It's really fun. I need to finish my bedroom so this definitely has given me some inspiration to finish. I'm visiting from SITS :)
ReplyDeleteOh good! So glad to help and inspire :)
DeleteOh and what is your blog, there isn't a link with your profile, would love to visit you too.
DeleteSO, so pretty!! Love it!!!
ReplyDeleteThank you!
DeleteLove this room - such a beautiful transformation! And especially love the idea for cord management - my cords are forever falling behind my nightstand! Absolutely fabulous!
ReplyDeleteYes! Mine were too and then especially after we the curtains up they were so hard to find. Eric didn't even know I was having such issues until I just flipped one night. I was gone at some meetings the following day and came home and he had solved my problem for me. :)
DeleteLove all of the wall hangings! Great inspiration!
ReplyDeleteThank you! I will be giving tutorials on how to make all of the ones that I made :)
DeleteI love what you did to the bedroom! Such a beautiful transformation. The area you used for the reading nook is perfect. I'd love a nook like that! Why is it that the master bedroom is always the last room in the house to make over? Ours is the same way. Your pictures inspired me!
ReplyDeleteJoanie @ ZagLeft
http://zagleft.com/
Thank you so much! Yes, it is sad that the one place in the house that is often the only place that is really your own, is the last place to get made it something you actually enjoy.
Deletebeautiful makeover! Thank you for sharing.
ReplyDeleteThank you and you are welcome :)
DeleteYour bedroom looks GREAT! At first I wasn't sure about the pics you had on facebook with the bookcase because I like wood look, but truthfully Love it! Very nice!
ReplyDeleteThank you! Yes, everyone definitely has different tastes and with the dressers and my bed still have the wood, the rest are just the accent pieces :)
DeleteYour room is gorgeous!! There is no way I could ever share a pic of mine... even on a good day it looks terrible. It's much to small for all that we have in there.
ReplyDeleteYea, the size and layout of my room definitely makes it only possible to arrange certain ways and trust me I had to spend a couple of days cleaning for the before pictures, as it was usually not anywhere as clean and as nice as those even. Since the redo I have kept it clean! Yea!
DeleteThis is amazing! You did such a good job with updating it. My favorite part is the reading nook! I love Target furniture. (I actually wrote about it on my blog today!) You are so talented. Awesome job!
ReplyDeleteThank you! The reading nook in my absolute favorite too. Yes, Target really does make some pieces that are pretty nice and the prices are ones I can handle
DeleteI LOVE your new bedroom, especially the reading nook. I would love love love to do something like this. I also have a huge issue with all our cords everywhere. I'm definitely stealing that idea! You're motivating me to update our master bedroom, which is just so plain and empty. I am loving your bedspread too. Beautiful!
ReplyDeleteThank you so much! Yes Eric totally fixed the cords all on his own after I had a meltdown about it one night. I don’t usually snap and freak out so since I did he definitely knew he needed to do something about it :)
DeleteIt really came out fabulous! I love the tips at the end too. Definitely not something normal people can do in two days like on "Trading Spaces" though that is what this totally looks like. :D
ReplyDeleteYes, if I had a ton of money could have done it in two days, but that isn’t reality.
DeleteI love that little nook off the side of your bed. It looks so cozy.
ReplyDeleteIt is! I just lay in my bed and stare at he space everything before I go to sleep- now I just need to go read a book in it!
DeleteIt's amazing! I love it! I especially love that you made it a wonderful place even in a rental where you didn't/couldn't paint. It's spectacular!
ReplyDeleteYep, I definitely feel like this is our house but yes in the end though there are some things I just don’t want to do since we are just renting. We just never know how long we will be in one area.
DeleteIt really looks wonderful! I love what you did! We really haven't done nearly enough to our house and now my husband and I are talking about downsizing. I think we will make a better effort next time around...hopefully in a much smaller house!
ReplyDeleteWe always talk about possibly buying a house, as it seems we may actually be here a while which is why I wanted to do things I could take with me easily.
DeleteYou did a fantastic job! The nightstands are perfect and that reading nook is AMAZING!!!
ReplyDeleteThank you! The reading nook is by far my favorite too.
DeleteIt looks so great!! I love the yellow night stands and your wall decor the most.
ReplyDeleteVisiting from #LOBS
Thank you! Those are definitely my favorite parts of it too
DeleteWOW!! This is awesome, I love the colors you used! And your wall art is FAB!!!
ReplyDeleteThank you so much! I really love it too
DeleteWOW! I love the yellow paint you re-did many of the furniture pieces with!
ReplyDeleteThank you! I too love the yellow
DeleteLove the pops of yellow! And, the reading nook turned out so cute! :) Pinning!
ReplyDeleteThank you so much! I do love the reading nook
DeleteWOW!!! This makeover is awesome! And I love the layout of your master... I'd kill for a larger master!
ReplyDeleteThank you! I used to hate the layout of my room as it just seemed awkward, but now it is perfect!
DeleteThis looks amazing! I love those nightstands.
ReplyDeleteThank you! The nightstands are my favorite and what got it all started.
DeleteThis is adorable! I love your little nook and I wish I had that space in my bedroom! I can't wait to see the tutorials for your wall hangings.
ReplyDeleteThank you! The tutorial for the important date decor is finished, there is a link at the bottom.
DeleteLove the reading area and the bookcase is so clever!
ReplyDeleteThank you so much!
DeleteLove it! It's so cozy!
ReplyDeleteThank you! I don't use my reading nook nearly enough
DeleteWhat a fabulous makeover! Love the bright pops of color! :)
ReplyDeleteThank you so much!
DeleteYou did such a great job fixing up your master bedroom!! It looks amazing! :)
ReplyDeleteThank you! This is by far the biggest project I have ever done, so very happy with how it turned out.
DeleteLooks awesome! I would love to have a little reading nook or an area I could have a couch/lounging instead of using the bed for lounging and watching tv at night. That is probably the worse thing for the lifetime of your bed but we still do it anyways. Love the pops of green and purple. :)
ReplyDeleteI love this so much! You did a fantastic job!
ReplyDeleteI love all the painting you did to your pieces. I am afraid fixing our bedroom wont be so easy. We have a sleigh bed and nothing open like you have. It does give me ideas about fixing up our front room where we have several bookshelves.
ReplyDeleteI am in love with the Target chair and the wall decor in your reading nook! I'm in the process of updating my office and yellow is my accent color :)
ReplyDeleteLove the yellow and blue! Really freshens it up and makes it cozy. Nice job!
ReplyDeleteIt looks gorgeous! I love the little book nook! great use of space! :)
ReplyDeleteIt turned out so pretty and functional!! Love your reading nook and the yellow paint color. It's a perfect pop of color!
ReplyDeleteThank you so much! Yes, for so long I just wasn’t quite sure what to do with my odd shaped room but love love it now.
DeleteI love all the things that you did. I think the paint alone made a big difference :)
ReplyDeleteIt really did make a big difference, made some of the pieces go from dated to contemporary and others just more fun
Deletesimply gorgeous! I love the spring colors!
ReplyDeleteThank you! Yes it feels so bright and happy now
DeleteThis is absolutely gorgeous! So bright and fun, I definitely need to re-do our bedroom and make it brighter!!
ReplyDeleteI absolutely adore this makeover, you did an awesome job! I especially love the little reading nook, and the yellow and gray theme.
ReplyDeleteSo amazing! I love that you pretty much took the chair inspiration & ran with it!
ReplyDeleteI am pretty sure you could not have done all of this on a budget or at least a small one. KIDDING. girl you have ad skillz and i love every detail of this makeover. You really changed this room. great job. def using some of your tips for my current bedroom makeover that will not be as cool as yours!
ReplyDeleteGreat job! Love the what you did to make it your own. I appreciate the tips! We need to get going on ours! Thanks for the inspiration!
ReplyDelete